
Beginners Guide how to play Violin

A Brief Background of the Violin
The violin is also called a fiddle. It’s a four stringed instrument that perhaps originated from Italy. It is called the queen of instruments. In the 1400’s, players started using bows to play the instrument of the guitar family. These bowed guitars developed into instruments called viols. The first violins date from the 1500s. They were developed from the early bowed instruments, rather than from the viols. By 1550, the top E string had been added and the Viola and Cello had emerged as part of the family of bowed string instruments still in use today. It is thought by many that the violin probably went through its greatest transformation in Italy from 1520 through 1650. In the 1600s, Antonio Stradivari, a pupil of Amati, perfected the design of the violin and produced some of the finest violins ever made.
Famous violin makers such as the Amati family were pivotal in establishing the basic proportions of the violin, viola, and cello. As violin repertoire became more demanding, the instrument evolved to meet the requirements of the soloist and larger concert hall. In the 19thcentury, the modern violin became established. The modern bow had been invented by Francois Tourte (1747-1835). It’s weight, length, and balance allowed the player to produce power and brilliance in the higher ranges. It was Louis Spohr’s invention of the chin rest around 1820 that made it possible for the player to hold the violin comfortably and play in the higher positions.
The Violin is an amazing musical instrument and many people would love to learn to play. Learning to play the violin can seem daunting and nearly impossible for some people but, you can learn to play this instrument even from the comfort of your own home. It doesn’t matter if you’re a complete beginner, a child, someone “too old”, everyone can learn to play the violin! When it comes to learning to play any instrument, let alone the violin, you’ll want to approach your education with a certain amount of self-confidence.
Parts of Violin

The violin typically has four strings, usually tuned in perfect fifths with notes G3, D4, A4, E5, and is most commonly played by drawing a bow across its strings. It can also be played by plucking the strings with the fingers (pizzicato) and, in specialized cases, by striking the strings with the wooden side of the bow (col legno).
Tuning of Violin:
Tuning a violin is easy if you follow these simple tips:
Remember to always tune from below the note to prevent strings from breaking.
Use the fine tuners as much as possible to prevent string breakages.
Tune the A string first, followed by D, G then E strings.
This is how orchestral violinists tune their violins. It does help to get into a good tuning routine.
String Nos
4 3 2 1


Choose one of the tools to tune your instrument. Slightly loose the tuning peg from the string. Once you have found the target note, push the tuning peg back into its place so that it locks and holds the string. Pick an electric tuner that listens for the note if you're a beginner. With this type of tuner, you play a string, and then the tuner tells you whether you are sharp or flat. This type works well if you don't have a very good ear yet, as it does the hard listening for you. You can find these types of tuners online or at music stores. In addition, you'll find many smart phone apps that will act as tuner.
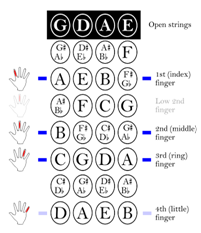
Finger Position of Violin
Almost every chart you will find will be based on the first position. Fingering is really important on the violin, than on other stringed instruments like the guitar. You can really get yourself in a mess if you use the incorrect fingers on the violin, which has no frets to guide you instantly back into place, to help with this we recommend applying finger tape to the fingerboard to guide you. First position covers the notes at the top of the violin and the thumb should be about an inch from the nut, slightly bent, and touching the neck at the middle joint and the wrist should be straight.

How to Grip the Bow
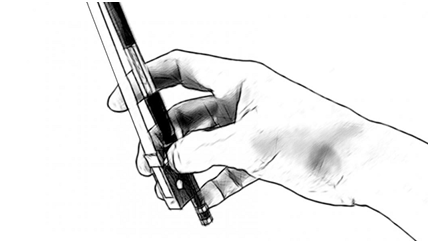
Thumb: supports the bow, provides fulcrum.
Middle Finger: closes the ring with the thumb to secure fulcrum.
Index Finger: presses the bow down and controls sounding point.
Ring Finger: controls Sounding Point.
Little Finger: lifts bow pressure.
The tip of the thumb supports the bow between the frog and the leather or winding. The middle finger rests opposite the thumb, the last joint touching the bow stick. The middle finger does not exert any pressure; it just secures the fulcrum with the thumb. The index finger touches the bow in the middle of the second phalanx.
How to Hold the Violin
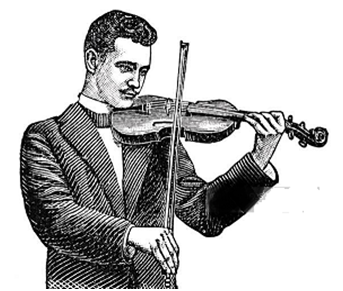
1. Sit or Stand Up Straight: Maintaining an upright playing posture is not only good for your body, it also helps create enough space between the violin and your body to allow for excellent movement.
2. Hold Violin Between Chin and Left Shoulder: The left hand needs a lot of flexibility and the fingers need to be able to move quickly.
3. Keep Left Shoulder Relaxed: If the left shoulder is tense, the left arm loses support from the torso.
4. Relax Left Arm Away From Body: The left arm needs space to move, as well as flexibility.
5. Keep a Straight Line From Left Elbow Through Left Wrist: It’s common for beginners to hold the palm up against the neck of the violin to support it. This puts a lot of strain on the wrist, in addition to reducing the movement range of the left hand.
6. Put Your Left Thumb in the Same Spot Every Time You Play: Playing in tune on the violin requires exact finger placement for each note.
7. Pretend to be the Best Violinist in the World: You probably already have a picture in your mind of what it looks like to play the violin.
What Is Note?
In music, the term note has three primary meanings: A sign used in musical notation to represent the relative duration, pitch of a sound and pitch class. Musical term note/tone in music describes the pitch and the duration of a musical sound. The first seven letters of the alphabet by which notes/tones that are distinguished C,D,E,F,G,A,B and they form a scale.
Steps of Major and Minor Scale: Scale in music theory, is any set of musical notes ordered by fundamental frequency or pitch. A scale ordered by increasing pitch is an ascending scale, and a scale ordered by decreasing pitch is a descending scale. Some scales contain different pitches when ascending than when descending, for example, the melodic minor scale. Hence there are two types of scales.

How Music Written?
Music notation or musical notation is any system used to visually represent aurally perceived music played with instruments or sung by the human voice through the use of written, printed, or otherwise-produced symbols, including ancient symbols or modern musical symbols and including ancient symbols cut into stone etc.
Staff:
Five horizontal lines and four equal spaces is called Staff

Cleff

Cleff is signs placed in the beginning of staff which enables one to determine the name and pitch of any note.
Sharp & Flat Notes:
More specifically, in musical notation, sharp means "higher in pitch by one semitone (half step)". Sharp is the opposite of flat, which is a lowering of pitch. An associated sharp symbol that resembles the number sign "#", ♯, occurs in key signatures or as an accidental.

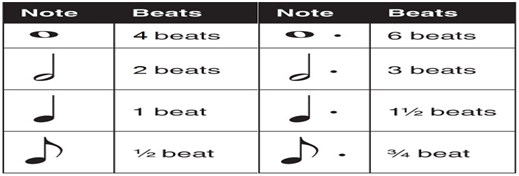
Value of Notes and Beats in Music:
In music notation, a note value indicates the relative duration of a note, using the texture or shape of the notehead, the presence or absence of a stem, and the presence or absence of flags/ beams /hooks/tails. Unmodified note values are fractional powers of two, for example one, one-half, one fourth, etc.
How music is written?
Music notation or musical notation is any system used to visually represent aurally perceived music played with instruments or sung by the human voice through the use of written, printed, or otherwise-produced symbols, including notation for durations of absence of sound such as rests. Many systems have been used in the past to write music. Today most musicians in the Western world write musical notes on a Stave, five parallel lines with four spaces in between them.

Type of Violins:
There are many violin makers from all across the world who create violins for specific name brands. Generally, there are two types of violins:
Acoustic or Non-Electric Violin: This is the traditional violin that is more suitable for beginners. The violin is a bowed string instrument that has the highest tune and is the smallest among the violin family of instruments. It is also called the fiddle when used to play traditional or folk music.
Electric Violin: As the name implies, electric violins use an electronic signal output and is suited for more advanced players. The sound of an electric violin is sharper than that of an acoustic.
Violins may also be classified by period or era:
Baroque Violin: The violin of this period had a shallower angle and neck, as there was not much thought given to chin and shoulder rests, and the strings were strung out of gut with equal tension.
Classical Violin: The violin of this period had a thinner neck and smaller heels than that of the Baroque period.
Modern Violin: The neck of the modern violin is more sharply angled, the wood used is thinner and smaller, and the strings are tuned higher.
Violins may also be classified by the country from which they originated such as China, Korea, Hungary, Germany, and Italy. Less expensive violins often come from China, while the most expensive, the Stradivarius, (named after Antonio Stradivari) comes from Italy. People who make violins are referred to as a "luthier."
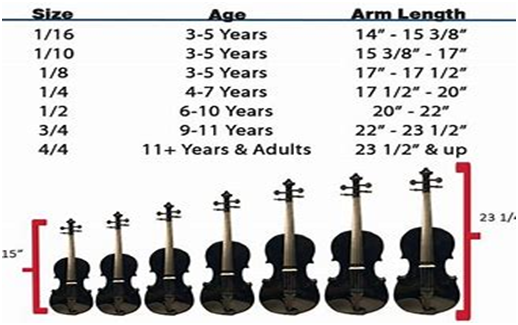
Sizes of Violin
1/16: This violin is suitable for young children, ages three to five years old, with an arm length of 14 to 15 3/8 inches.
1/10: For young musicians, this violin is great for ages three to five years old, with an arm length of 15 3/8 to 17 inches.
1/8: This is also suitable for young violin enthusiasts, ages three to five years old, with an arm length of 17.1 to 17.5 inches.
1/4: With an arm length of 17.6 to 20 inches, this violin is suitable for children four to seven years old.
1/2: For children ages six to 10 years old, this violin has an arm length of 20 to 22 inches.
3/4: Children nine to 11 years old with an arm length of 22 to 23.5 inches will enjoy playing this size violin.
4/4 or Full-Size Violin: For violinists ages nine and above, this violin has an arm length of 23.5 and up. This is the size for adults.
How to select the correct size of Violin:

Violin is not an easy instrument – it takes years to learn and a lifetime to master. Even the greatest players of all time had much to learn about the violin. The instrument truly provides a beautiful sound across a variety of genres and should be held in high regard as a wonderful instrument.
Straight Bowing Strategies: This is definitely one of the harder things to get right. Bowing straight is something that needs more practice.
Finger Tapping/Rolling: Finger tapping and rolling is an exercise that is practised away from the violin.
The 4th Finger: The fourth finger gives the same note as the open string above – so, 4th finger on the D string is A.
Scales are a great way to polish and perfect various bowing techniques. Using whatever scale is appropriate for your level (one-octave, two-octave, or three-octave), play your scale using one of the bowing techniques described above.
Learning of Vibrato
Just imitating violinists is not the way to learn vibrato. Just wobbling around your finger without knowing what you should do, doesn’t give you a good vibrato. You need to do some preparatory exercises that teach you the motor skills for a good vibrato. Start doing this exercise with your third finger as it is the easiest, but practice the other fingers just as much after that. Pick a tone on a string and keep your left thumb on the same spot on the neck of the violin and move your finger over the string while bowing.
The goal is not that this sounds good, but it’s an exercise that teaches you to move your wrist fluently in the direction of the string.

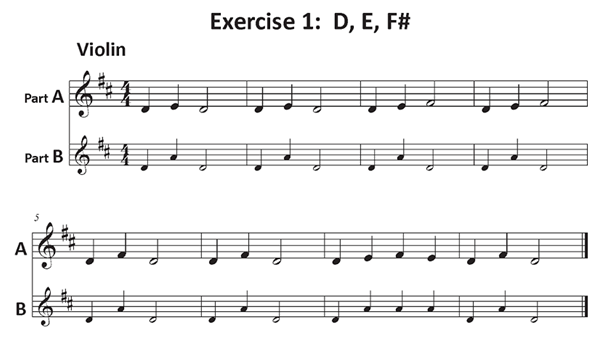
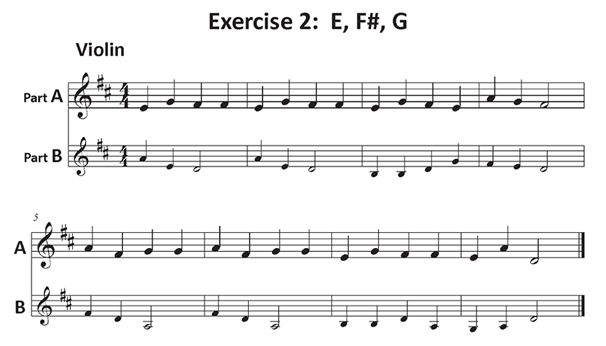
Try and practice this mixed Melody
Another melody

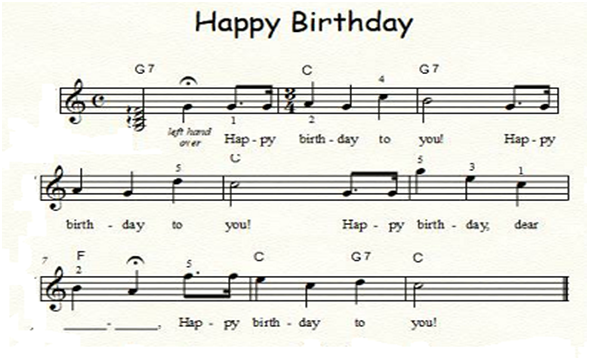
Try This melody on Violin

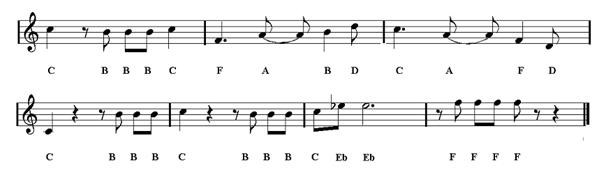
My Cindy

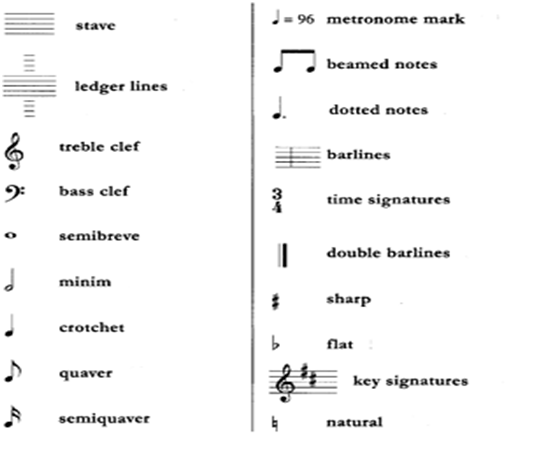
Various Musical signs & Symbols for reference
Conclusion
Different techniques give you different feels, but all of them are great for adding some interest to your playing. Violin technique includes playing open strings. A major scale with vibrato technique play. Natural harmonics on the A string at the octave, octave and a fifth and two octaves. Playing the violin entails holding the instrument between the jaw and the collar bone. The strings are sounded either by drawing the bow across them (arco), or by plucking them (pizzicato). The left hand regulates the sounding length of the strings by stopping them against the fingerboard with the fingers, producing different pitches. Properly executing the above techniques will allow you to form a solid base for any style of playing violin. We are all aware that music and "atmosphere" go together. You might have heard of farmers who increase production by playing music to their animals.


